Installing Python locally (optional)
Attention
For the purposes of this summer internship, you should be able to complete everything in DataHub (in the cloud). Installing Python on your personal computer is 100% optional and we include this only for completeness. Also, if you already have your personal installation of Python (Anaconda, PyCharm, etc.), you should probably stick with that.
While there are many benefits to using a cloud-based platform like DataHub for our Python needs, you might find that for your personal projects (such as this upcoming research project), it is easier to work with your local installation of Python. Some reasons, in no particular order, can include:
Running Python without an internet connection
Flexibility to install more packages permanently
Easier data access and security (i.e., files are stored locally)
Using more compute resources (e.g., RAM), if your computer is better equipped
Note
It’s a personal preference, and if you are unsure if this is best for your personal situation, let’s chat. 🙂
However, installing Python and all the packages you need on your computer is not as easy as installing other software. A Python environment on your computer can get quite… complicated. So, this is a set of instructions to help guide you as you install Python and associated files on your computer. For this process, we typically like to accompany our mentees as they go through it, just to make sure that everything installs correctly without a hitch. We know what it’s like to be excited to start a software project, only to be blocked by troubleshooting the installation, so we don’t want this misfortune to befall anyone.
The Anaconda/Miniconda distribution 🐍
The native Python language is already quite powerful, but there are several bells and whistles that have been developed by the community to make it even more powerful and user friendly. At some point, people realized that it made sense to bundle these extra packages along with the default Python code, and arguably the most popular distribution of Python is Anaconda, or “conda” for short. By installing Anaconda, we not only get Python, but also an entire suite of the most popular packages along with robust virtual environments.
The caveat, however, is that the Anaconda distribution is very large and (personally) has too many bells and whistles, so we don’t advise installing it. 😅 Instead, we recommend Miniconda, which is a lite version of Anaconda that has all the essential elements and makes it easier for you to add on what you need. We’ll use Miniconda for the steps below.
Steps to install Miniconda
To install Miniconda, please go to this page and select the appropriate installer for your system.
We recommend choosing the version with Python 3.8 for better compatibility, although 3.9 should be OK.
Error
Please do not install the Python 2.7 version of Miniconda. You will not have a good time. 😢
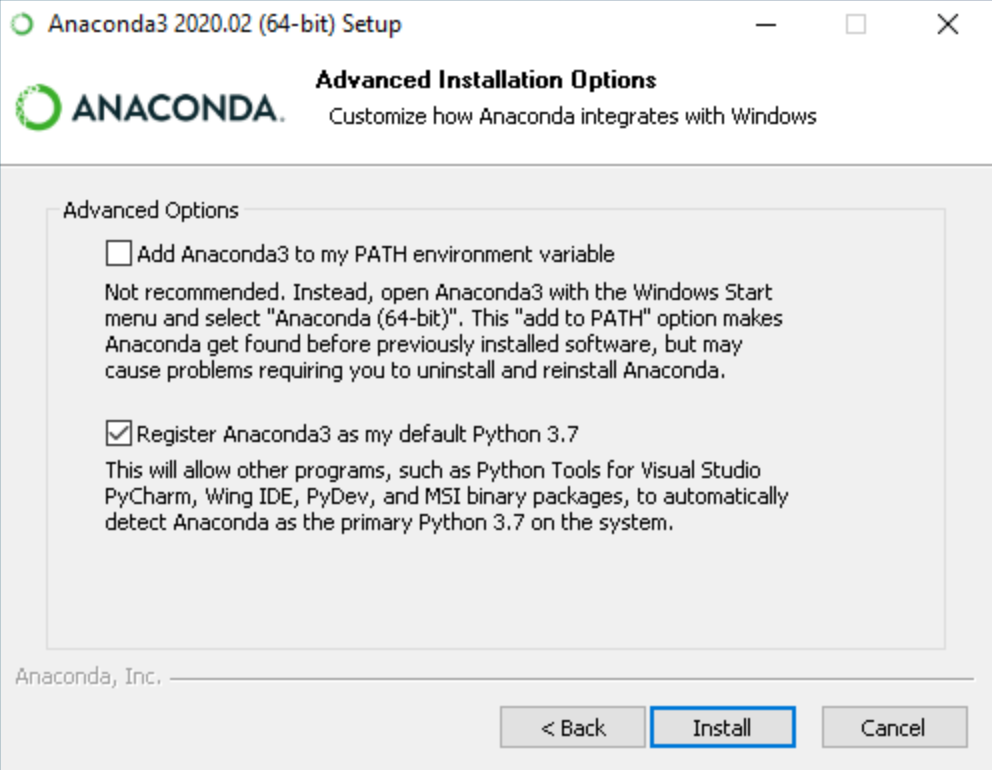
Open the installer and follow the instructions.
Do check the box that lets Anaconda be your default Python version.
Only if you don’t have other Python versions installed on your computer, you can also check the box that adds it to
PATH.
Verify installation
Now to run Python:
On Windows, you can use Anaconda Prompt, which you can find if you search for the application.
If you added Anaconda to
PATH, you can also use the native Command Prompt.
On Mac/Linux, you can directly use Terminal.

Next, try to do the following:
The first thing you should notice is the
(base)word on the very left, which indicates the default virtual environment that is loaded. Seeing this is a good sign.Type
python --versionto see which version of Python you have installed. If something reasonable shows up (e.g.,Python 3.8.x), then it’s a good sign.Type
conda env listto see which virtual environments have been created. At this stage you should only see(base). More on this in the next section.
If all of the above worked for you, then it’s likely installation was successful! 🎉
Conda virtual environments
By now you’ve probably seen us use “virtual environments” a few times, so it’s time to dig into what this phrase means. An environment is essentially a configuration of Python and its associated packages and settings. You’ll set up an environment any time you want to use Python for a programming project, and this, in and of itself, is straightforward. But now let’s imagine you want to do a second project, and this project requires a different set of Python packages that conflict with your current environment (e.g., different versions are required). Heck, maybe Project #2 requires a different version of Python altogether! Do you reinstall the packages and lose the ability to work on Project #1? Do you buy a new computer? Do you shake your fist at the sky in anger?

That’s where virtual environments come in.
Anaconda can create separate environments, each with their own [possibly different] versions of Python and associated packages, all contained on the same computer (hence, “virtual”).
The (base) word you see is one such virtual environment, and it is best practice to create a new environment for each project.
To do so, use the following command in the Prompt/Terminal window:
conda create --name my_env_name python=3.8 numpy scipy pandas matplotlib scikit-learn jupyter
Let’s break this down:
condais the command to run conda.createis the keyword to say “Create a new virtual environment.”--name my_env_nameis the input parameter + argument for the name of your virtual environment. You choose whatmy_env_nameshould be (no spaces!). 🙂python=3.8specifies which version of Python you want installed (in this case, the latest Python 3.8.x).numpy scipy ...are a list of packages that you also wanted installed in this environment. This is the list we want to start off with, so keep all six of them there. Recall that unlike Anaconda, Miniconda doesn’t come with a lot of these packages preinstalled, so we have to manually specify them!
As the packages install, you might have to type y + Enter to confirm the installation. Once you have finished creating your environment, you have to activate it by typing:
conda activate my_env_name
and pressing Enter, where my_env_name is the name of the environment you created.
As an example:
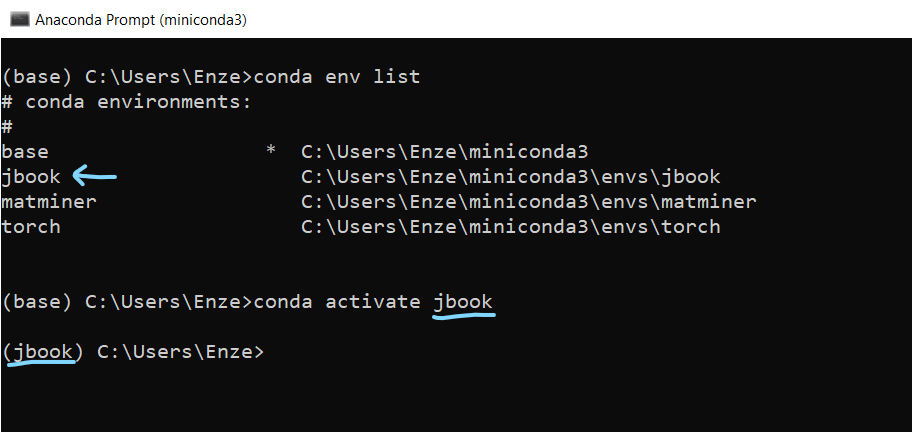
You should then see (base) be replaced by (my_env_name).
Now you can work with the desired version of Python and its correct packages!
Note
You will have to go through this activation process each time you open a new Prompt/Terminal window, as conda will always open in the default (base) environment.
Tip
For more information on managing environments, please see the official documentation.
Installing more packages
Sometimes, a package that we need (particularly if it’s for a specific materials science application) does not come installed by default with Anaconda.
To see which packages are currently installed, you can use the conda list command.
To install more packages, there are several options, which we list in order of preference:
Use
conda install [package-name]. This invokes Anaconda’s built-in package manager to make sure there are no conflicts with existing packages and is generally the safest option (it’s one of the main reasons people use Anaconda!).Use a different channel to see if you can find the package, e.g.,
conda install -c conda-forge [package-name].Use
pip, the default package manager in Python, e.g.,pip install [package-name]. This pretty much always installs the newest version of a package, and may cause conflicts with your conda environment (it doesn’t do compatibility checks).
Tip
You can search in the documentation for that package for the preferred installation method.
Generally speaking, all Python packages are pip-installable, while only some are conda-installable.
For this module, you should install pymatgen and matminer as addition packages.
In the Prompt/Terminal, activate your conda environment and then type the line:
pip install pymatgen==2020.10.20 matminer==0.6.5
General use
Jupyter notebooks
When programming on your own computer, we suggest you still do it in a Jupyter notebook environment as that’s pretty user friendly.
If jupyter is correctly installed in your conda environment, then you can type
jupyter notebook
to start the notebook.
Note
If you start a notebook and then decide to install a new package, you have to completely close the notebook windows (and maybe start a new Prompt/Terminal, depending on how you installed it) before you can use that package.
Python files
You can also type your code into a Python file (.py extension) using your favorite text editor, such as Atom or Sublime Text, or your favorite IDE, such as PyCharm or Spyder.
You can then run the file using the Prompt/Terminal command:
python my_python_file.py
The line of code above will only work after you’ve navigated (in your Prompt/Terminal) to the same directory as my_python_file.py.
Troubleshooting
Python (and certain packages) can be very tricky to install, so if you run into issues, consult the Anaconda documentation, Google, or YouTube. Please also feel free to ask your instructors or classmates on Slack about any technical difficulties you encounter.